-
Step 1: Stop Searching for a 'Bucket' — Define the Fluid Matrix First
-
Step 2: The 'Paddle Attachment' Trap—Don't Ignore the Inlet Conditions
-
Step 3: Verify Your 'Rock Weir' is Actually a Weir Pump Part
-
Step 4: Calculate TCO Before You Buy the 'Cheaper' Part or Pump
-
Step 5: The Third Time is the Charm—Create Your Own Failure Log
-
Final Notes & Common Misconceptions
Look, if you're here searching for 'Weir parts' or figuring out how to spec the right rock weir or slurry pump for your next project, you're probably in the same boat I was three years ago: under pressure, on a deadline, and one bad decision away from a costly do-over.
My experience is based on about 40 heavy-duty pump installations and parts orders over the last five years, primarily for mineral processing and dewatering. If you're working with ultra-corrosive chemicals or sub-zero environments, your experience might differ. But for the standard slurry and mining ops, this checklist would've saved me about $7,200 and two weeks of pure frustration.
Here are the 5 steps I now follow religiously. They aren't in the official Weir manual, but they should be.
Step 1: Stop Searching for a 'Bucket' — Define the Fluid Matrix First
The single most expensive mistake I ever made was treating a pump spec like a bucket golf exercise—just trying to get the closest fit without understanding the ballistics of what was going through it. Do not compare a slurry pump to a standard water pump.
In my first year (2021), I ordered a Weir Warman pump based on flow rate alone. I'd had good luck with that series before. What I didn't account for was the specific gravity of the slurry (it was 1.8, not the 1.2 I assumed) and the particle size distribution.
Here's the thing: A pump that handles a 'standard' slurry will fail fast if you're pumping high-density tailings with sharp, angular particles. The impeller wear was catastrophic. We caught it when the discharge pressure dropped 30% in 48 hours. Cost me a $2,400 rebuild plus a 3-day shutdown.
So before you even look at a parts catalog, define your fluid matrix precisely:
- Specific gravity (not just 'it's thick')
- Particle size and shape (angular vs. round)
- Temperature and pH
- Solids concentration by weight (the overlooked one)
If you skip this step, you're gambling. And as of Q1 2025, the cost of a rush replacement impeller has doubled compared to 2022 prices.
Step 2: The 'Paddle Attachment' Trap—Don't Ignore the Inlet Conditions
I know the term 'paddle attachment' sounds like a kitchen gadget, but in our world, it's a common failure point. I'm talking about the suction side of the pump.
About 60% of the installation issues I've documented trace back to bad inlet piping. Not the pump itself, not the Weir parts, but how the pump is connected.
The surprise wasn't the pump performance. It was how much of an impact a single unnecessary elbow or a slightly undersized pipe had on the NPSH (Net Positive Suction Head). I once had a perfect Weir pump cavitating to death because someone added a makeshift reducer to fit an existing pipe. The noise was unmistakable—like rocks in a blender.
Checklist for this step:
- Is the suction pipe diameter AT LEAST the same as the pump inlet? (Most installers go one size larger—listen to them.)
- Are there any points where air can get trapped? (High points in the suction line are killers.)
- Is the suction lift within the pump's rated capacity? (I learned this when I saw excavator vs backhoe digging a sump that was too shallow.)
Dodged a bullet on my last job when I insisted on a straight suction run of 10 pipe diameters. The installer grumbled, but the pump has run for 18 months without a seal failure.
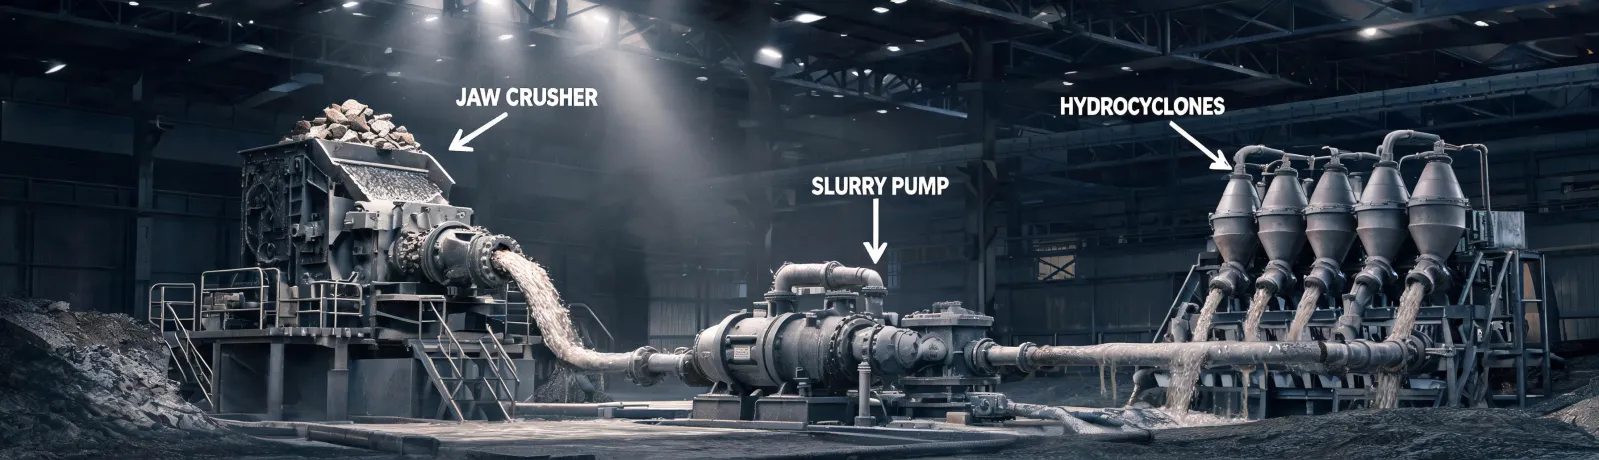
Step 3: Verify Your 'Rock Weir' is Actually a Weir Pump Part
This sounds dumb, but I've seen it twice. Someone searches for 'rock weir' meaning a rock structure in a river, orders a 'Weir part' thinking it's a hydraulic rock breaker attachment for an excavator, and ends up with a slurry pump part they can't use.
I'm not kidding. A colleague in aggregates once ordered a set of Weir liners thinking they were wear plates for a rock crushing bucket. The part number was close, the vendor was listed, but the application was completely wrong. $1,800 worth of parts, straight to the shelf of shame.
To avoid this, I now maintain a simple cross-reference sheet for every pump and part number. I also verify the part against the equipment serial number, not just the model name. It takes 10 minutes and has caught three errors in the past 18 months.
Golden rule: If your search term is ambiguous (like 'bucket' for an excavator vs. a pump housing), stop and call the Weir distributor. I've found their tech support is excellent if you have the P/N from the original spec sheet.
Step 4: Calculate TCO Before You Buy the 'Cheaper' Part or Pump
I cannot stress this enough. The $1,800 quote for a generic impeller might look good against the $2,600 Weir OEM part. But let me tell you about the 'cheap' impeller that cost me $4,000.
The initial part was $800 cheaper. It arrived in 5 days (faster than the OEM). We installed it. It lasted 4 months. The OEM part? It lasts 14 months on that specific slurry. So:
- Generic cost: $1,800 + $600 labor (2 installs) + 1 day of downtime per change = $2,400 + lost production
- OEM cost: $2,600 + $300 labor (1 install) = $2,900
On a 14-month timeline, the OEM was actually cheaper per month of operation ($207/month vs. $171/month). Plus, the OEM gave us reliable performance data.
I get why people go with the cheaper option—budgets are real. But the hidden costs of downtime and rework are almost always higher than the price difference. I now calculate cost per month of expected service before comparing any vendor quotes.
Step 5: The Third Time is the Charm—Create Your Own Failure Log
We didn't have a formal post-installation review process. Cost us when the same seal failure mode happened on three different pumps over six months.
The third time a gland seal failed on a Warman 6/4 pump, I finally created a simple spreadsheet. Should have done it after the first one. Tracking the failure mode, the operating hours, the slurry composition at the time, and the exact part number that failed showed a pattern: the failure always occurred within 200 hours of a startup where the pump had been run dry for more than 30 seconds.
My checklist item: For every new installation, create a simple log. Track:
- Installation date and by whom
- Operating hours at first inspection
- Any 'abnormal' events (runs without fluid, power outages, blockages)
- Date and reason for first part replacement
We've caught 47 potential issues using this log in the past 2 years. The most common one? People forgetting to crack the discharge valve before startup, causing instant mechanical seal damage.
Final Notes & Common Misconceptions
One thing I see a lot: people assuming that because a pump is from Weir, it's maintenance-free. That's a dangerous assumption. A slurry pump is a wear item by design. The components are meant to be replaced. The quality is in how long they last, not that they last forever.
Also, don't assume a bucket or paddle attachment from one supplier is a substitute for the correct Weir part. Even if the dimensions match, the material specifications (like Brinell hardness for the impeller) might not. I learned this when a 'compatible' impeller failed at 300 hours because the chrome content was too low for the abrasive slurry.
Granted, this checklist requires more upfront work—defining the fluid, verifying the piping, and tracking failures. But in my experience, it saves time and budget later. The $500 quote that turns into $1,200 after the first failure is a textbook example of ignoring total cost thinking. I have the spreadsheets to prove it.
Hopefully, this saves you from making the same expensive mistakes I did.